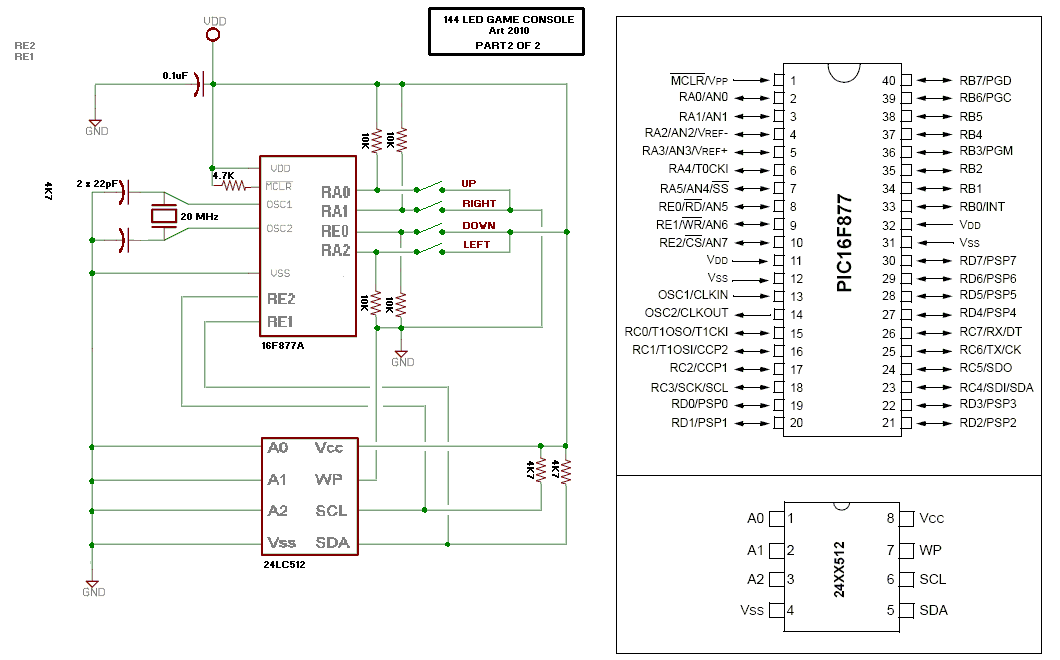
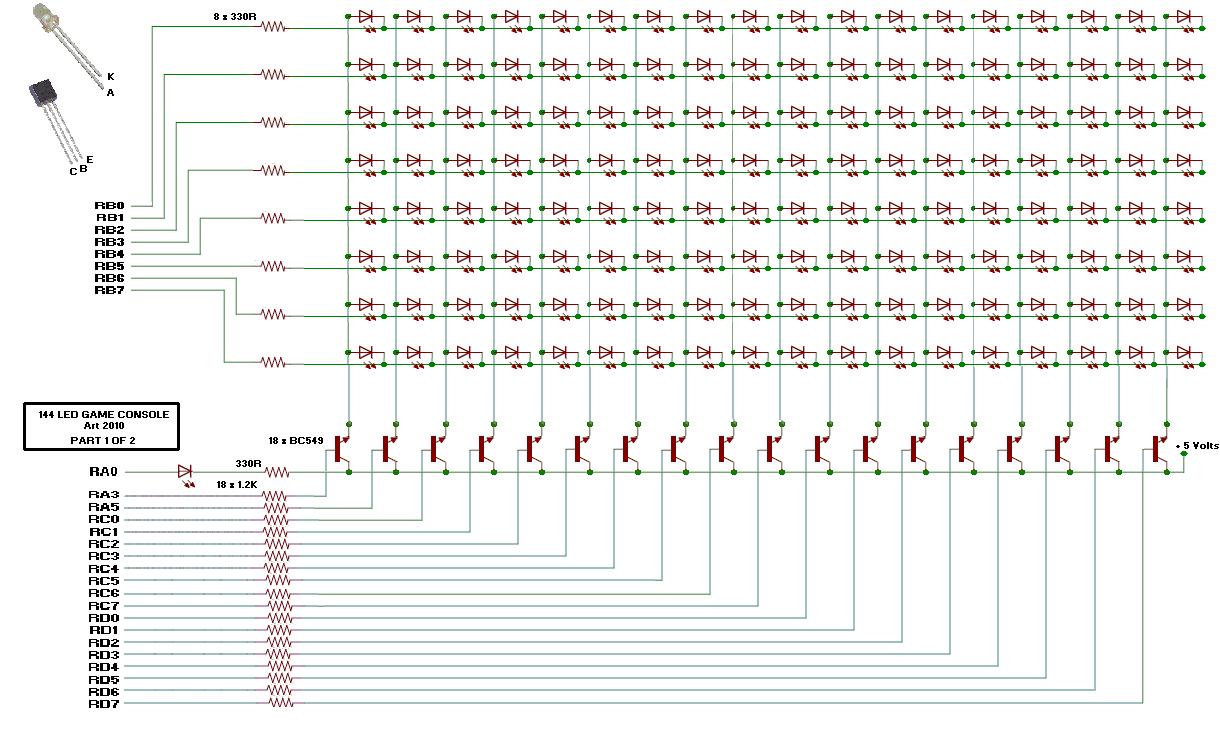
144 LED Games Console Project


Closed Thread
Results 1 to 40 of 104

Hybrid View

  1. #1


    Did you find this post helpful? Yes | No

    Default $30.00 ???


    I'm glad I was sitting... I know things cost more depending on where you live, but this surprised me... I don't know what you have available for buying components there but they are nowhere near that much here, buying from an "expensive" distributor (Digikey). Here's a link for red 5mm TH parts: http://search.digikey.com/scripts/Dk...me=160-1678-ND. As you can see 100 pcs. is $8.60USD ($9.60AUD) A comparable SMD (http://search.digikey.com/scripts/Dk...=160-1463-1-ND) is $13.00/100. This is a 1210 package; I don't know that I'd go smaller than that. Again, for beginners SMD would be hard enough to solder, let alone smaller. Smaller devices "typically" don't have a round lens as well.

    The "joystick" buttons are not a problem. I didn't see how many pins are used on the uC. How about a couple of pads for a rolling ball tilt switch (one pin on the uC)? These are about $1.50 here (so that'd be $6.00 there) If you tilt the board 90 degrees the joystick pad (and display) can "rearrange" to the correct orientation?

    Resonators with built in caps are cheaper (about $0.60) than a crystal.

    It looks like any NPN will do. 2N5210 parts are about $0.15USD. For whatever reason, "BC" parts are slightly more than "2N" parts here.

    I'll start drawing the schematic... I have a fresh martini in front of me so I'll be on cruise control... the package type can wait until more people have weighed in...

    Mike Tripoli
    Last edited by mtripoli; - 18th February 2010 at 03:08. Reason: a

  2. #2


    Did you find this post helpful? Yes | No

    Default Why not...

    I've looked at the footprints for the components. I've wanted to do this in the past, but frankly when you are getting paid to do something you can't screw around. I'm going to design the PCB so that it can take both through hole parts or SMD parts in the same footprint. What you care to populate is up to you...maix and match! Theoretically it *shouldn't* take any more board space than one or the other...

    What was your spacing on the leds and do you think it optimum? The "aspect" ratio obviously effects how the display looks. It *looks* like 0.100" centers to me...

    Mike Tripoli

  3. #3
    Join Date
    Aug 2003
    Posts
    985


    Did you find this post helpful? Yes | No

    Default

    Sorry, I was away for two nights. Lucky I took my laptop and pic programmer with
    me so I saved a lot of chip space again

    I don't know what my LED spacing is. As long as it's even, it should work.

    The EEPROM in the circuit def shouldn't be needed now, but I don't think a tilt
    switch is needed either. The orientation of the joystick is determined by the game you're
    playing, so it can be switched with the game.

    One of the pins that was connected to the EEPROM should now be used for a
    serial port I think.
    I was using one of the LED input ports, but without the EEPROM, the serial ort could have it's own pin.
    The other EEPROM pin could now perhaps be connected to a PCB speaker.

  4. #4
    Join Date
    Aug 2003
    Posts
    985


    Did you find this post helpful? Yes | No

    Default Version 3

    Hi again Guys,
    I've done a few updates including support for a 250 character display message
    for the scroller. This was done by making space for tables in program memory again.
    Now the only thing other than a message on the on-chip EEPROM are game high scores and message length.

    Removal of the external 12C EEPROM chip provided extra pins.
    The serial port now has a dedicated pin, and a PCB speaker has been added.

    Both games now have basic sound, and the unit clicks as you type characters into your terminal program
    when using serial message programming mode.

    I thought I'd do more with this one, but I've moved on to another pic project.

    Cheers, Art.
    Attached Files Attached Files

  5. #5
    Join Date
    Aug 2003
    Posts
    985


    Did you find this post helpful? Yes | No

    Default

    Thought I'd better post that there is an error in the LED matrix schematic.
    The 18 transistors should all be connected to + 5 Volts, not Gnd.
    Cheers, Art.

  6. #6


    Did you find this post helpful? Yes | No

    Default Ahhh... no

    Quote Originally Posted by Art View Post
    Thought I'd better post that there is an error in the LED matrix schematic.
    The 18 transistors should all be connected to + 5 Volts, not Gnd.
    Cheers, Art.
    What's connected to +5V? Not the emitter. Not on an NPN.

    If it's a PNP the load goes in the emitter (emitter follower, and doesn't need a base resistor) or in the collector (and needs the resistor). It's drawn now as an NPN open collector. If it is an NPN and *something* is connected to +5 it's the collector (the only time I've ever connected a postive supply rail to the emitter of an NPN has been when designing very high speed switches and we ain't going there)...

    I've got all but the switches and ICSP header and related components in place. You can see the top layer here: http://www.scarydesign.com/144/144topview.pdf It hasn't been optimized for size yet or mounting holes etc.

    The pads look a little odd because you can use TH or SMD components. I'll wait to do more until this has been worked out...

    Mike Tripoli

  7. #7
    Join Date
    Aug 2003
    Posts
    985


    Did you find this post helpful? Yes | No

    Default

    They are BC549 (NPN) transistors with the collectors connected to + 5 Volt.
    All of the LED anode columns are connected to the emitters,
    and the cathode rows are sunk directly by the pic pins.

    I deleted the LED schematic section from flickr. It may also picture the wrong transistors
    (wired for a common cathode display).

    Ooh.. the PCB artwork is nice

  8. #8
    Join Date
    Feb 2006
    Location
    Gilroy, CA
    Posts
    1,530


    Did you find this post helpful? Yes | No

    Default Re: Ahhh... no

    Welcome to the forum Svrzic. (But please, no double postings here)

    You connect them at the ports for the PIC chip. For instance: RB0, RB1, RB2, etc.
    Last edited by ScaleRobotics; - 22nd November 2011 at 13:53.
    http://www.scalerobotics.com

  9. #9
    Join Date
    Jun 2012
    Posts
    1


    Did you find this post helpful? Yes | No

    Default Re: Ahhh... no

    can I request or suggest Sir Art?
    the 144 led game console was spectacular ^_^

    im not completely good in pic basic that's why I will be needed your help or anyone out there just to improve if possible the message scroller...

    i want to make it more portable.. as ive scanned your program it is very mind bugling
    how about we will make the RE.1 a start/ok button???
    is it possible to make a message if we use:
    UP = (Capital) A to Z and 0 to 9 plus special charater
    Down = (reverse) special character plus 9 to 0 and Z to A
    if we will press left/right = the letters will be small letters... then press start to enter the next character

Similar Threads

  1. Conway's Game Of Life
    By wellyboot in forum mel PIC BASIC Pro
    Replies: 45
    Last Post: - 28th May 2020, 06:14
  2. new and need help
    By smeghead in forum mel PIC BASIC Pro
    Replies: 5
    Last Post: - 3rd November 2008, 20:19
  3. LCD will not start
    By btaylor in forum mel PIC BASIC Pro
    Replies: 49
    Last Post: - 24th May 2007, 02:30
  4. can't even flash an LED
    By bruno333 in forum mel PIC BASIC Pro
    Replies: 7
    Last Post: - 28th April 2005, 13:27
  5. simple LED Blinking project
    By koossa in forum mel PIC BASIC Pro
    Replies: 4
    Last Post: - 11th December 2004, 01:25

Members who have read this thread : 1

You do not have permission to view the list of names.

Posting Permissions

  • You may not post new threads
  • You may not post replies
  • You may not post attachments
  • You may not edit your posts