144 LED Games Console Project


Closed Thread
Results 1 to 40 of 104

Hybrid View

  1. #1
    Join Date
    Dec 2011
    Posts
    3


    Did you find this post helpful? Yes | No

    Default Re: 144 LED Games Console Project

    Hai
    i tried to use the serial posability. But i can not change anyting.
    I use the max232. With this i can read and write to a 16f628a, s the com and max232 are working.
    I first tried the original rx and tx ports but later i saw i had to use port e.1.
    No result.
    i push porta.1 when startup. The screen is blank.
    sending text
    restart
    no result.
    What dont i see??

    greatings Harrie

  2. #2
    Join Date
    Aug 2003
    Posts
    985


    Did you find this post helpful? Yes | No

    Default Re: 144 LED Games Console Project

    To Harrie & anyone else who has the hardware working,
    but cannot, for whatever reason, change the message stored in on-chip EEPROM.
    Here's something you can try:

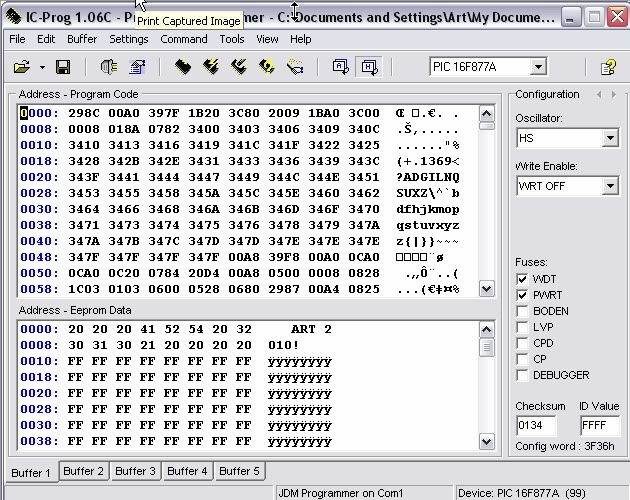
    Download ICprog Windows pic programming software for free from here:
    http://www.ic-prog.com/download.html

    Start the exe program, and select the 16F877A pic from the drop down menu of supported pic chips.
    Then you should be able to open the pic HEX file, and it should look like this:


    Bear in mind that if you manually edit the message this way,
    you also have to manually edit the message length.

    note the "non message" locations at the bottom end of on-chip EEPROM
    Code:
    DATA @$FC,12                            'text message length
    DATA @$FD,49 : DATA @$FE,125 : DATA @$FF,0            'set initial high scores for games

    Now you can edit the individual message locations, update the message length, cheat on hi scores if u have to, and save the hex file!
    Now open the hex file in your own pic programming software and write to the 16F877A.

    Cheers, Art.

  3. #3
    Join Date
    Dec 2007
    Location
    Paris
    Posts
    101


    Did you find this post helpful? Yes | No

    Default Re: 144 LED Games Console Project

    Just found this great project and was really excited!

    I have just finished drawing a PCB for it, with two possible versions: one with 5mm leds and the other with large 10mm leds. It's all using surface mount components, but they are not that hard to solder (in fact it is easier!).

    The matrix is now driven my a pair of PNP/NPN or P/N channel mosfet in order to boost the brightness. Since the multiplexing routine slice the display in 18 increments, it is possible to boost the brightness by feeding more intensity in the LEDs this way. For simplified rooting of the board, I also changed the pin allocations for the PIC. The program will need to be modified a bit to account for that, and for the inverted signal needed to drive the base of the PNP transistors.

    The board has an integrated regulator (7805) and also an optional DB9 for serial communication with voltage converter (using a simple transistor, not a full MAX232). It also feature an ICSP connector, so it can be easily reprogrammed for other projects.

    Need to check a few things, but I'll be happy to release the gerber files here. Also I'm planning to make an order from my PCB manufacturer, so if anyone is interested I can sell spares for a reasonable price.


  4. #4
    Join Date
    Aug 2003
    Posts
    985


    Did you find this post helpful? Yes | No

    Default Re: 144 LED Games Console Project

    Nice
    Would love one if I had any confidence in soldering smd parts :O

  5. #5
    Join Date
    Dec 2007
    Location
    Paris
    Posts
    101


    Did you find this post helpful? Yes | No

    Default Re: 144 LED Games Console Project

    I'll send you some, here's a video I made for soldering SMD's:

    http://www.mactronique.com/showArtMn...11&zone=movies

  6. #6
    Join Date
    Aug 2003
    Posts
    985


    Did you find this post helpful? Yes | No

    Default Re: 144 LED Games Console Project

    Lol, nice, but electronics is not so much a love of mine
    I only did what I had to do to write software for it

    One day I'll write an interrupt driven clock for it using DT's elapsed timer.
    Didn't quite have it figured out at the time.

  7. #7
    Join Date
    Dec 2007
    Location
    Paris
    Posts
    101


    Did you find this post helpful? Yes | No

    Default Re: 144 LED Games Console Project

    A clock would be nice, should not be too hard to write as I've seen some implementation somewhere on this forum. Darrel's routines for interrupt are very simple to use, so you could use a timer interrupt to derive your 1Hz signal. I have built some clocks too, but they all use I2C RTCs (so that they can keep time while power is off). Newer PICs have built in RTCs too, so that may be something to look for... but I think they require an external 32.768kHz xtal for Timer1 which is not planned on the PCB layout.

    Keep in touch! I'll get back in the forum when I get the PCBs manufactured and your code modified. I'm a bit the other way around, software is not my thing... I'm actually quite impressed by the routine you wrote for this project!

Similar Threads

  1. Conway's Game Of Life
    By wellyboot in forum mel PIC BASIC Pro
    Replies: 45
    Last Post: - 28th May 2020, 06:14
  2. new and need help
    By smeghead in forum mel PIC BASIC Pro
    Replies: 5
    Last Post: - 3rd November 2008, 20:19
  3. LCD will not start
    By btaylor in forum mel PIC BASIC Pro
    Replies: 49
    Last Post: - 24th May 2007, 02:30
  4. can't even flash an LED
    By bruno333 in forum mel PIC BASIC Pro
    Replies: 7
    Last Post: - 28th April 2005, 13:27
  5. simple LED Blinking project
    By koossa in forum mel PIC BASIC Pro
    Replies: 4
    Last Post: - 11th December 2004, 01:25

Members who have read this thread : 0

You do not have permission to view the list of names.

Posting Permissions

  • You may not post new threads
  • You may not post replies
  • You may not post attachments
  • You may not edit your posts