

Yes,
It said something like overwriting previous address. It also did not like the comma in the @ line.
Ken


Yes,
It said something like overwriting previous address. It also did not like the comma in the @ line.
Ken
There is not a comma in the @ line... typo???Originally Posted by Kenjones1935

The overwriting previous address is from not have the config lines in the PBP inc file commented.
But if it is working...
Dave
Always wear safety glasses while programming.
Ken,
If you just want to detect the direction of a light, I'd just get some generic CDS cells, similar to these:
http://search.digikey.com/scripts/Dk...-p9001&x=0&y=0
Take 6 or 8 of them and point them in different directions around your car and connect them to the ADC channels on your PIC. Scan the ADC channels to see which one is sucking up the most light...
steve
I have the bits and pieces. I have the help of this forum.
Now I gotta settle my brain on a design and get to it.
I am imagining the autonomous racer going out into the lobby through one door and returning through the only other door.
Two choices come to my mind.
1. Place a light bulb on the floor at the entrance door. Have the PIC driven car find the light source and follow its beam.
2. Make sure all the doors in the lobby are closed. Have the PIC driven car follow the wall around the room until it finds the second open door.
What do you all think? Got some better ideas?
Thanks
Ken
Hi Ken,
I think either the "seek the light" or the "keep the wall on your side" technique would be fine for your purpose.
The "stay close to the wall" method is probably more versatile because it could work in any room with walls...
The "seek the light" method sounds a little cheaper and easier to implement (just a gut feeling). Just point a bunch of CDS cells around the perimeter of the car, read the values into your ADC channels and look for the one with the lowest resistance. If the lowest resistance one ISN'T at the front of the car then you need to correct the steering until is.
With the light method, you'll need to regain control before the car actually GETS to the light, or have a way to make sure it passes to one side so the car doesn't dive straight into the heart of the sun...
steve
Decisions have been made. Avoiding the complexity of servo steering and electronic speed control drive wheels seems like a good decision. I am not comfortable with my very dated electronics (read that voltage control, FET's, current surge capacitors) memories.
I will make a fritzl-like wall hugger
(http://letsmakerobots.com/node/928)
that can also be radio controlled. I will use my toy level car much like fritsl's. I have a HiTec Ranger III RC system complete with a HiTec HFS-03MM three channel receiver.
I have Microchip's DM164120-2, a small demo board with a PIC16F887 device on board and a small surface mount prototype area. I am learning how to code it with PICbasic Pro.
All I need to finish are the SRF05 proximity sensors.
Wish me luck. I will keep you posted.
Ken
The answer is Velcro.
The question is, "How will I attach the PICkit pc board to the plastic chassis of the RC car and the DPDT carrying proto board?"
Ken
The appeal of the RC cars for hooking middle school students into technology is their near perfect miniaturization of real automobiles.
The toy grade cars just do not have that appeal. They are also too slow.
I understand and can probably duplicate the Pulse Width Modulation waves needed to control the hobby grade motors and servos. The car that I have has three channels. One is unused, it can be the signal controlling the switch from and to autonomous mode.
The idea of using velcro to attach the proto and PICkit boards has eased my mind allot. It is so obvious. Why did I not think of it?
I think, after being certain yesterday, that I have changed my mind. I shall modify my hobby level car for this project.
Ken (sigh....)
I am now using my hobby level RC car. I am having a Vcc problem. The RC car has a 7.2v battery pack to drive the wheels. These a big batteries, but the wheels use allot of power.
I would like to use four 1 and 1/2v AA batteries to power everything except the drive wheels. That's six volts. The PIC wants 5v. I can not find reverence to voltage regulation inside the PIC. I think I need a voltage regulator - a subject about which I know nothing. Does just inserting a 5v regulator in the Vcc line from the batteries do the job? Which 5v regulator?
Lastly the USB port supplies a pin with 5v on it. Do I just put an ON/OFF switch in the plus 6 volt battery line and turn that source off when using the USB for programming?
Is having three sources of power a blessing or a hindrance ?
Ken
If you use 4 AA rechargeable batteries then you will not need a regulator, nominal voltage is 1.2 volts each. But the PIC you are using will run on 2 volts with the 8 Mhz OSC...
So... Use any AA battery pack with a LM317 voltage regulator set to run at ~3.6 volts for the PIC. You will need three 470 ohm resistors to set the regulator. Then you should be able to fire the transistor that is triggering your relay from the PIC.
http://www.national.com/mpf/LM/LM317.html#Overview
The PICKIT2 has an "auto detect" setting for the voltage. if there is voltage on the PIC the PICKIT will deal with it. No switch needed.
Dave
Always wear safety glasses while programming.
Like this Dave?
<IMG SRC="http://www.picbasic.co.uk/forum/attachment.php?attachmentid=3821&stc=1&d=126030791 2 ">
-Adam-
Ohm it's not just a good idea... it's the LAW !
Yes, like that.
In practice due to resistors being what they are I have seen 3.3 to 3.7 as you mention. But that has been good enough for me and 3.6 things like SD cards and such.
Dave
Always wear safety glasses while programming.
I have been looking for a good tool to draw schematics. Which one did you use? Is is freeware? Are the drawings vectors? How did you get it on this page?
Ken
Dave,
I read that I do not need a voltage regulator to drive my PIC16F887. Then I read which voltage regulator is the best for me.
I am drawing, with a sharpened graphite rod encased in a wooden sleeve, my beginning schematic. I will show it to you all once I figure out how.
Ken
Sorry for the confusion. I was just giving some options.
If you want to use a battery pack greater than 5 volts then use the regulator. The reason I like the LM317 is the adjustable aspect and it will handle 1.5 amps.
You may want a regulator while using the ADC on the PIC.
You can upload your drawing with the manage attachments button under the text box. Click quote on Adams post to see how he displayed it.
Dave
Always wear safety glasses while programming.
Hi Ken,
Dave was saying you could use 4 rechargeable (1.2V) cells as is (no Voltage regulator) or regular cells (1.5V) with a LM317 Voltage regulator. You could even use the 7.2v battery pack to power your PIC with the Voltage regulator.
I use Paint.NET. It is not supposed to be a drawing program but it works okay for me.
It is free photo editing software for Windows http://www.getpaint.net/
It is free and open source. Paint.NET is like Microsoft Paint on steroids.
-Adam-
Ohm it's not just a good idea... it's the LAW !
Question:
I do not have an oscilloscope. sigh....
Google said that the USB spec rated Vcc at 5 volts. The PICkit 2 printed circuits indicates its Vcc as coming straight from the Microchip PICkit USB interface. It goes directly into the PIC itself. Is there a voltage regulator inside that plastic case? If not the PIC16F887 is seeing 5volts?
On the subject of rechargeable batteries the RC hobby cars gobble through their Ni-Ca drive wheel charges at an awesome rate. I was hoping that the PIC batteries would pretty much last an afternoon. Wouldn't four AA alkaline non-rechargeable batteries be the easiest to deal with? Just put a new bunch in at the start of the day.
Ken
Ken
The PicKit does have a voltage regulator built in. The software for it even has a place to set the voltage when using the PicKit2 for a power source.
If you are not using the PicKit2 for a power source the PicKit2 can read the chips voltage and display it.
AA batteries should run all day, but if you power from the motor batteries like Adam suggested then the PIC runs when the car runs. So does it matter? Maybe the motors will make some noise on the circuit? AA batteries would help in that case.
Dave
Always wear safety glasses while programming.
It is handy to just plug in the demo board and run your development project in the early experimental troubleshooting stages, without bothering with a power supply. Then when you need to add the whole circuit you can switch over to the battery pack.
If you do use the PicKit2 for a power source in some of the development stages, it is a good idea to run it through a powered USB hub.
That way, the powered hub can take the hit when it accidently gets shorted or connected to the wrong polarity. All computers have USB protection circuits but after reading forums for years, there are many people with damaged USB ports.
Dont ask how I know things get shorted or mis-wired. Just guessing.
-Adam-
Ohm it's not just a good idea... it's the LAW !
Nuts! is appropriate.
A diversion. The PC into which I had installed MPLAB and PIC BASIC PRO stopped working this afternoon.
There will be a delay in my pursuit of PICkit perfection.
Ken
Hello everyone.
My machine is back.
I need to know where PIC assembly language is defined. In what document?
I discovered while playing with a blinking program that
LOW PORTD.0
HIGH PORTD.1
and
PORTD = %10
Do not do the same thing. In particular PORTD = %10 clears all the rest of PORTD while the LOW and the HIGH BASIC commands only affects pins 0 and 1. (see below)
Another question. Is there an available document that would provide me with the assembly language interpretation for each PICBASIC PRO command? I found my answer in the .asm code, but I was hoping for an easier all encompassing document.
----snip from COMPLICATED_BLINK.asm--------
#define _PORTD??4 PORTD, 004h
#define _PORTD??5 PORTD, 005h
#define _PORTD??6 PORTD, 006h
#define _PORTD??7 PORTD, 007h
#define _PORTD??0 PORTD, 000h
#define _PORTD??1 PORTD, 001h
INCLUDE "COMPLI~1.MAC"
INCLUDE "PBPPIC14.LIB"
MOVE?CB 0C0h, ADCON0
HIGH?T _PORTD??4
HIGH?T _PORTD??5
HIGH?T _PORTD??6
HIGH?T _PORTD??7
-------end snip------------
My two Devantech Ultrasonic Range Finder SRF05 units just arrived by Fedex.
Soldering iron - here I come.
Ken
Hey, good you made it back!
I'm afraid I try and avoid .ASM as much as possible, but if I was looking for the document where PIC ASM is defined.... I'd start with the data sheet for your PIC, in the section titled "Instruction set summary".
steve
I have printed 300 (ran out of paper) of 384 pages of the PIC16F88x Data Sheet 41291D. On page 231 I found "15.0 INSTRUCTION SET SUMMARY". This document has no Table of Contents.
I need help getting onto hardware prototyping. I am fifty miles from the nearest well stocked electronics components store. What I need is a list of items to purchase when I make the trip. If anyone has a photo I would greatly appreciate it.
I imagine soldering onto my PICKIT 2 connection wires with plugs or sockets. (male or female depending on which wire is 'hot') One or some for A/D converters, PWM input, PWM output, various sensors (sonic range finder and visual spectrum light sensor) and whatever else I might need (suggestions please).
I imagine attaching these various items to my inline proto boards again with wire and matching plugs or sockets.
What off the shelf items would make this 100 mile round trip fruitful.
Ken
Hmmm. You have a 16F887, right?
The data sheet I have for it (41291F) is 328 pages and definitely has a table of contents....
It looks like pages 233 - 241 deal with the instruction set.
http://ww1.microchip.com/downloads/e...Doc/41291F.pdf
But you've got PICBASIC PRO, right? I don't think there's too much need for you to learn ASM unless it's just for educational experience. Why make things harder for a "first project"?
Before you go on a shopping spree, you should figure out what it takes to drive your motors and servos, etc and come up with a schematic or at least a block diagram of some kind.
I assume your car has a DC motor for drive, and a servo for steering position? How much current does the motor draw? You'll probably want one or more logic level MOSFET's to drive it.
I'd get a slab of punchboard to build your circuit on. You'll want a good selection of resistors and caps... If you use CDS cells to "see" light, then you'll want resistors to form voltage dividers with the CDS cells so you can easily measure with an ADC. Of course what values you need depends on many things... including which CDS cells you get. You'll probably want some fairly high value (100K) for gate to source resistors on your MOSFETS. You'll need some caps (maybe some .01 or .1 uF ceramic) for supply bypassing at your PIC and other chips.
Errr... who knows what else you'll need! I think you need more of a game plan, and at least a rough schematic before you drive 50 miles to shop....
steve
First things first.
I can try to make myself a circuit diagram with a pencil. Better yet I can learn how to use CAPTURE. Then I can share it. I'll give that a shot.
Microchip seems to make many products that interface directly with the 16F887. I have a problem picking out which are appropriate.
Thanks.
Ken
Or you could use something like this during the learning/development phase (<$150 and should last you a lifetime) EasyPIC6 PIC® development system:

I don't think you're gonna need all that much stuff.
You've got the ultrasonic sensors already. A handful of cheap CDS and some resistors takes care of seeing a visible light source.
You'll need to build whatever it takes to drive your motors. Or figure out how to adapt whatever the car has already.
Maybe it would be fun if you posted some pictures of the car you are using, all opened up so we can see what drive motors and control electronics it's got in it already?
Yes, definitely come up with a way to draw and share schematics... even if it's just a pencil and paper and a scanner...
steve
Hey Ken,
I dunno if this is any good, but the price is right... Maybe worth a try for drawing schematics?
http://tinycad.sourceforge.net/
steve
Or do it right the first time around with EagleCad Free Version
I tried EagleCAD a couple years ago and hated it. I found it to be rather difficult and non-intuitive to use.
I use DipTrace now and I like it a lot. It has a freeware version also
http://www.diptrace.com/
steve
I have the car. It uses a Tomahawk Reverse Electronic Speed Controller(http://www.nosram.com). I want to use that system directly from the RC receiver for racing. It is proven and its response is sure. It would be nice if I could get the same three wire sockets that this device is accustomed to plug into, but that seems more than I can expect.
I plan to use DPDT switches to toggle between RC receiver control and PIC control. I plan to use the third channel on the RC system to tell the PIC to flip the DPDT switches.
The attached pictures of the car show that it is four wheel drive (there is a drive belt down the middle). This limits my ability to attach the PIC and attendant devices. Once the PIC control works I will be able to get more appropriate 1/10 scale cars or trucks.
I hope the pictures came out OKAY.
Ken
Hey Ken, thanks for the photos! I always love to SEE peoples projects.
So the original control circuitry is clearly all sealed up, so it looks you can't hack into it and use any of it's electronics when yer buggy is under PIC control. No problem, I was just curious.
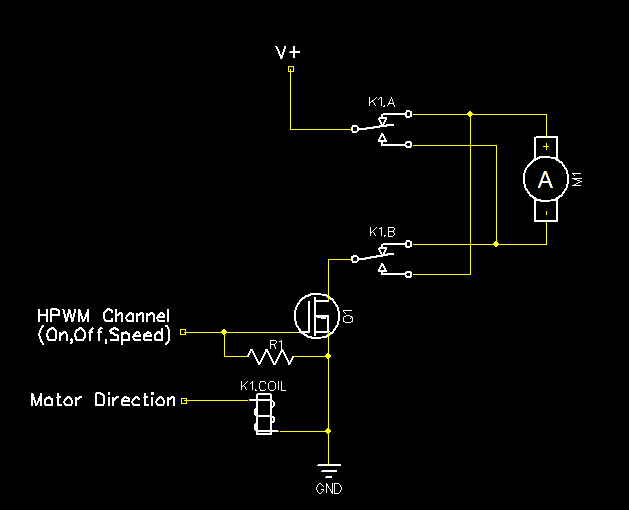
FWIW, here's a simple circuit that uses a MOSFET to drive a motor and a DPDT relay for direction control. You would need one PIC pin to PWM a signal to the MOSFET for speed control, and one pin to drive the relay coil. Of course, depending on how much current your relay draws, you may need another MOSFET or bipolar transistor to drive the relay coil. And a protection diode across the coil always...
Anyway, that would give you speed and direction control on your motor.
steve
Well, I see it's already too late to edit my original post (sigh), but I didn't want to give the wrong impression when I said I hated EagleCAD..
I'm sure it's a fine program, and I know a LOT of folks use it and love it.
I just found it to be rather... unfamiliar.. compared to other programs I've used, and I found it difficult and non-intuitive (to my brain) to learn.
I stumbled across DipTrace one day and found it to be much more to my liking.
Anyway, I didn't want to sound like I was bashing EagleCAD. I used it long enough to realize it's a good program... I just didn't like the way it felt. It's just a personal preference thing.. like what's yer favorite color.
steve
steve, thank you for your direct control suggestion.
My thought is to hack into the present connection between the RC receiver and the ESC for the drive wheels. I figured with a DPDT switch I could toggle the two wires that are presently connecting the receiver to the ESC (the third wire is ground) between their present state and the PIC. Two wires, one DPDT switch. The red wire is PWM signal. The white one is Vcc. (Actually I think I should leave the white wire floating. Let the ESC use its own power to interpret the PWM signal.) Good idea? No? Insert a diode?
The RC receiver gets its Vcc and gnd from the ESC. My ancient Triplett multimeter tells me that this Vcc is +5v. I know the battery is +7.2v. The ESC must have a 5v regulator on board.
The other DPDT switch is needed to perform much the same operation on the Vcc and signal wires between the receiver and the steering servo motor. In this case the white Vcc wire is driving from the receiver. This one I will switch and drive from the PIC when it is in control.
Thus when the PIC is in control the RC receiver's 5v comes from the
PIC. When the third RC channel signal commands return to RC control the PIC will interpret that and flip the DPDT switches back.
I have this on paper drawn by a #2 pencil. Unreadable by anyone but myself. I'll make you guys a schematic. That may take a couple days. I will be distracted tomorrow and I need to learn about CAPTURE ( I have a bootleg copy. I have to give it a try.)
Ken
Anybody using CAPTURE for schematics? I am trying, but I have been hit for a loss. I need the library file for the Microchip PIC16F887. I found just that at:
http://f1.grp.yahoofs.com/v1/cKwuS-E...w/PIC16F88.OLB
Trouble is when I download the file and try to open it with CAPTURE, the error window pops up saying: "Unable to load file 'C:\ORCADWIN\CAPTURE\LIBRARY\PIC16F88.OLB'. Object Not Found."
The file really is there. I can open it with NOTEPAD, but a lot of good that is...
Ken
I received in the mail yesterday a booklet that mentioned the WowWee product Rovio. They have done what I am planning. They have a BOT which accepts external commends (via WIFI) and also runs autonomously. Interesting.... Not as sexy as my idea (IMHO)
http://www.wowwee.com/en/products/te...ce/rovio/rovio
I'm little by little making a schematic using ORCAD's CAPTURE product.
I am working on my idea not in complete electronic detail. My first picture will include all significant pieces, all connectors, all multi-conductor wires and my best guess as to which piece goes on which prototype board.
This will give me enough of a concept to take to my local RC Cars establishment and to Do It Yourself Electronics. After that the transistors', resistors', capacitors' batteries' and PIC pin selection details will be created.
Thanks for your continued interst.
Ken
Looking forward to hearing more and seeing the pictures.
Dave
Always wear safety glasses while programming.
Attached below is my first try at which parts go where on my radio controlled car. I drew it with a Tee square and triangles. (I could not stick a thumbtack into our oak cutting board? Drawing boards were made of maple - I think)
The parts in the red section are originally in the car.
The blue section is hoped to be on the PICkit 2. (There is an added toggle switch which I may or may not be able to solder to that printed circuit.)
The yellow section is two sonic range control units each on its own fairly small pc card. I need to devise a method to attach them to the car plus an electrical connection method.
The rest, in black, is presumed to fit onto an inline prototype card.
A big issue is the connectors. The more the better if I can make them reliable. I welcome your judgments.
I have not included electronic details. I think I know which PIC pins to use. The three different Vdd sources (USB supplied, 6 volt battery pack and 7.2 volt battery pack) boggle my mind. If I can settle on a physical layout then resisters, capacitors, and transistors will be next.
I need to figure out how to trigger PIC interrupts from the light sensor and the sonic range control.
HAPPY NEW YEAR.
More details.
Originally the pulse width modulated signals from the radio receiver control the steering servo motor and the amplifier (speed control) which drives the DC motor.
My design has the PIC interrupting that service by controlling the multiple double pole double throw relay switches.
Channel 3 from the radio receiver be used to tell the PIC to toggle between autonomous control and radio control. This decision can be overridden with the toggle switch in the middle of the picture.
Once in autonomous control the car has two means of evaluating its environment. A narrow angle lense (the cardboard tube from a toilet paper roll?) light sensitive device and two sonic range control devices.
The light sensor could find a incandescent light bulb. Once found (by turning in a 360 degree circle for example) a simple line following algorithm should lead the car to the light source.
The front and right side mounted sonic range controls could guide the PIC counter clockwise around the inside of a room. This idea is on the WEB at:
http://letsmakerobots.com/node/928
Thanks all,
Ken
A quick judgment please.
I just discovered solderless breadboarding. Does it work? Is it reliable? I think I can buy some at You Do It tomorrow. Is it a good idea?
Ken
 Members who have read this thread : 1
You do not have permission to view the list of names.
 Posting Permissions


Bookmarks