144 LED Games Console Project - Page 2


Closed Thread
Page 2 of 3 FirstFirst 123 LastLast
Results 41 to 80 of 104
  1. #41


    Did you find this post helpful? Yes | No

    Default Gerber files and schematic

    Following are links for downloading the latest schematic and PCB Gerber files for the PCB.

    Schematic: http://www.scarydesign.com/144ledgam...dschematic.pdf
    PCB PDF: http://www.scarydesign.com/144ledgame/144ledgame.pdf
    Gerber file (in RAR): http://www.scarydesign.com/144ledgame/144ledgerbers.rar

    The board is 4.5" x 4.75". There are mounting holes on the four corners for a 6-32 screw.

    The Gerber file contains the Gerbers and drill files. You can send this as is to a board house to get boards.

    The leds, transistors, small capacitors and resistors can take either through-hole or SMD components. Resistors and caps are 0805.

    The pushbutton switches are 6mm x 6mm tactile type.

    You can use a three terminal resonator or a crystal and caps; your pick. If you use the HC49U you can lay it down on the board. There is a pad connecting to ground; solder a piece of wire from the metal case to this pad.

    Many input voltage capabilities. No matter what you choose, I'd recommend a 7-9VDC supply; nothing more than 12VDC. Keep in mind that if you use the bridge rectifier input there are 2 diode drops. You can bolt the voltage regulator to the board for a little heatsinking though I don't think it's needed.

    There's a small "proto" area with +5 and ground available.

    Let me know if anything looks squirrely.

    Have fun.

    EDIT: I used "cutePDF" to generate the PDF of the PCB. I don't know why but the pads look a little "odd". They really aren't like that in the Gerbers...
    Last edited by mtripoli; - 13th March 2010 at 23:14. Reason: more info

  2. #42
    Join Date
    Aug 2003
    Posts
    985


    Did you find this post helpful? Yes | No

    Default

    Nice work

    I guess I'll go find a PCB house that will do hobbyist quantities.

  3. #43
    Join Date
    Aug 2008
    Posts
    81


    Did you find this post helpful? Yes | No

    Default Shematic project complete

    hello someone has Shematic project complete
    I really enjoyed the project I'm more questions to the input pins of the buttons
    can someone help me
    thanks

  4. #44
    Join Date
    Aug 2003
    Posts
    985


    Did you find this post helpful? Yes | No

    Default

    Hi,
    Have you built the hardware and have it scrolling messages?

    There are two buttons that behave differently with the hardware you produce from the PCB.
    The pic program assumes two button pins are pulled to gnd, and the other two are
    pulled up.
    The change made in the hardware PCB requires all input buttons be pulled high
    (or low.. don't quite remember).

    Did you build from mrtripoli's PCB artwork, or schematic?

  5. #45
    Join Date
    Aug 2008
    Posts
    81


    Did you find this post helpful? Yes | No

    Default 144 LED Games Console Project

    hi art
    aminha and doubts over the buttons to program the mesagem the pc
    are the same DIP switch ,1, DIP switch 2 ,DIP 3 DIP switch, DIP switch 4
    or has other buttons ...

  6. #46
    Join Date
    Aug 2003
    Posts
    985


    Did you find this post helpful? Yes | No

    Default

    My prototypes have DIP switches connected in series with each of
    the four buttons so that a button could be "held down" easily.
    I didn't intend for the DIP switches to be used by anyone else though.

  7. #47
    Join Date
    Aug 2010
    Posts
    4


    Did you find this post helpful? Yes | No

    Default

    I can not see Mtripoli ... Do not open the thing for me.

  8. #48
    Join Date
    May 2004
    Location
    NW France
    Posts
    3,615


    Did you find this post helpful? Yes | No

    Default

    Quote Originally Posted by Dorneliss View Post
    I can not see Mtripoli ... Do not open the thing for me.
    Hi, Dorneliss

    Looks those files simply have been removed from the server ...

    also note MTripoli has not posted anything since end of April ...

    Alain
    ************************************************** ***********************
    Why insist on using 32 Bits when you're not even able to deal with the first 8 ones ??? ehhhhhh ...
    ************************************************** ***********************
    IF there is the word "Problem" in your question ...
    certainly the answer is " RTFM " or " RTFDataSheet " !!!
    *****************************************

  9. #49
    Join Date
    Aug 2010
    Posts
    4


    Did you find this post helpful? Yes | No

    Default

    Wow! What a pity! Does anyone have the file to upload ...?

  10. #50
    Join Date
    Feb 2007
    Location
    London UK
    Posts
    5


    Did you find this post helpful? Yes | No

    Default Project files

    Quote Originally Posted by Dorneliss View Post
    Wow! What a pity! Does anyone have the file to upload ...?
    I didn't bother saving the gerbils because I do home etching and was going to do my own single sided board, but I have the schematic and a PDF of the board files. I also made an overlay picture as follows:


    https://dl.dropbox.com/u/5346257/144ledgame%20PCB.pdf
    https://dl.dropbox.com/u/5346257/144LEDGAME.pdf

  11. #51
    Join Date
    Aug 2010
    Posts
    4


    Did you find this post helpful? Yes | No

    Default

    Thanks for your help!

  12. #52
    Join Date
    Aug 2010
    Posts
    4


    Did you find this post helpful? Yes | No

    Default

    Will I get to use a pic 18f4520 pic instead of 16?

  13. #53
    Join Date
    Aug 2003
    Posts
    985


    Did you find this post helpful? Yes | No

    Default

    Hi Guys,
    I finally got hold of a picture of someone else's completed version:


    I was seeking this just for verification/confidence that schematics are correct, etc.
    If you look carefully you can see "Snake" on the display. This is the intro screen for the snake game.
    Cheers, Art.

  14. #54
    Enigma2011's Avatar
    Enigma2011 Guest


    Did you find this post helpful? Yes | No

    Default Re: 144 LED Games Console Project

    Quote Originally Posted by Art View Post
    Hi Guys,
    I finally got hold of a picture of someone else's completed version:


    I was seeking this just for verification/confidence that schematics are correct, etc.
    If you look carefully you can see "Snake" on the display. This is the intro screen for the snake game.
    Cheers, Art.
    Helllo,
    First I would like to say all positive comment about your project, one say congrat!!!!
    Please , can you confirm correct polarization of LED diodes because if you look shematics you can cee that collector transistors are on +5V or you change something in hex file???
    Please confirm this schematics https://dl.dropbox.com/u/5346257/144LEDGAME.pdf and what hex .file you used, please let me know!

    regards,

  15. #55


    Did you find this post helpful? Yes | No

    Default Re: 144 LED Games Console Project

    Hi guys

    I'm sorry for grave-digging, but I am trying to make my own version of this project for school. Since all files (the ones from mtripoli and dropbox) have been removed I was wondering if anyone still has them...

    Thanks in advance!

    EDIT: amazing project btw, thanks a lot Art and all other contrbutors!

  16. #56
    Join Date
    Nov 2003
    Location
    Wellton, U.S.A.
    Posts
    5,924


    Did you find this post helpful? Yes | No

    Default Re: 144 LED Games Console Project

    Dave
    Always wear safety glasses while programming.

  17. #57


    Did you find this post helpful? Yes | No

    Default Re: 144 LED Games Console Project

    Thanks a lot, but I already noticed that... That isn't the up-to-date version of this project, neither is it the version that mtripoli posted.

    I might be new, but I do know how to read...

  18. #58


    Did you find this post helpful? Yes | No

    Default Re: 144 LED Games Console Project

    I have finished my eagle schematic, download and edit if you want. Any help is welcome! ;-)

    Schematic.zip

  19. #59
    Join Date
    Nov 2003
    Location
    Greece
    Posts
    3,816


    Did you find this post helpful? Yes | No

    Default Re: 144 LED Games Console Project

    Hmm, this is not Micro$oft to have every Tuesday updates of the software... We write our own and if have difficulties then we ask politely for help presenting our job so far.

    Sorry, but this is how it works.

    Ioannis

  20. #60
    Join Date
    Feb 2006
    Location
    Gilroy, CA
    Posts
    1,530


    Did you find this post helpful? Yes | No

    Default Re: Ahhh... no

    Welcome to the forum Svrzic. (But please, no double postings here)

    You connect them at the ports for the PIC chip. For instance: RB0, RB1, RB2, etc.
    Last edited by ScaleRobotics; - 22nd November 2011 at 13:53.
    http://www.scalerobotics.com

  21. #61


    Did you find this post helpful? Yes | No

    Default Re: 144 LED Games Console Project

    Ok, after way too many emails from way too many people I've posted the files again. Here they are: http://www.scarydesign.com/144led/144LEDGERBERS.rar. Get them, save them, repost them somewhere else; this will not last forever.

    To the dude that sent me a personal email asking me to not only repost the files, but explained in broken russian/english that the design didn't suit him and he wanted it changed to support USB with new code and would I get "right on it" YOU ARE THE REASON I PULLED THE FILES. All info is there to have a PRO PCB HOUSE make the boards; these were not designed for kitchen sink laser print transfer so forget complaining that the traces are too thin etc. and if you haven't figured out that a wire soldered on the top and bottom of a drilled hole is the same as a plated though hole, I just don't know what to tell you. Happy Halloween, Thanksgiving, Merry Christmas, Super Rosh Hashanah Kwanzaa and grandma's birthday. Please stop sending me emails asking for a favor "just for you". I do love to do "favors"; my rate starts at $75.00/hr. with a 10 hour minimum.

  22. #62


    Did you find this post helpful? Yes | No

    Default Re: 144 LED Games Console Project

    Quote Originally Posted by mtripoli View Post
    Ok, after way too many emails from way too many people I've posted the files again. Here they are: http://www.scarydesign.com/144led/144LEDGERBERS.rar. Get them, save them, repost them somewhere else; this will not last forever.

    To the dude that sent me a personal email asking me to not only repost the files, but explained in broken russian/english that the design didn't suit him and he wanted it changed to support USB with new code and would I get "right on it" YOU ARE THE REASON I PULLED THE FILES. All info is there to have a PRO PCB HOUSE make the boards; these were not designed for kitchen sink laser print transfer so forget complaining that the traces are too thin etc. and if you haven't figured out that a wire soldered on the top and bottom of a drilled hole is the same as a plated though hole, I just don't know what to tell you. Happy Halloween, Thanksgiving, Merry Christmas, Super Rosh Hashanah Kwanzaa and grandma's birthday. Please stop sending me emails asking for a favor "just for you". I do love to do "favors"; my rate starts at $75.00/hr. with a 10 hour minimum.
    Thanks a lot mate.

    In attachments you'll find my version of the project, enjoy!
    Attached Files Attached Files

  23. #63


    Did you find this post helpful? Yes | No

    Default Re: 144 LED Games Console Project

    Quote Originally Posted by Svrzic View Post
    can someone tell me how to edit my post?
    I've edited schematic, and here it is http://www.2shared.com/file/EZ6gNZQ5/SCH.html , can someone tell me where to connect that R19?
    If someone can edit that schematic, I would be greatfull.
    I used R19 for an extra power LED, which you haven't connected yet. There were some errors in that schematic.
    I suggest you download the latest version in the post above... ;-)

  24. #64


    Did you find this post helpful? Yes | No

    Default Re: 144 LED Games Console Project

    Quote Originally Posted by Svrzic View Post
    thanks, but I have 17years, and in school we are making SCH and PCB with tango, and I won't buy displayes, I buyed 144 LED diodes.
    Can you just connect that R19 on my schematic that I uploaded, and tell me if I have connected LED diodes correctly, because I edited your schematic
    Your schematic looks a little odd for the displays. As shown it looks like the leds being used are offset in different directions so if the they are physically pushed together there would be rows and columns not lit. The resistor you are so worried about (R19) originates from one of the "d-pad" switches. These switches are pulled low and are active high as drawn in the schematic I did. I believe Art changed the code to reflect that. In his original code he had it as drawn with two pulled high and two pulled low for no reason whatsoever. Why you have another low value (120 ohm) resistor tied here I can't imagine. It looks to me like you simply copied the schematic wrong. Look at the original schematic in the RAR file I posted. This is not a difficult project. You've admitted "editing" the schematic; don't make changes to a circuit if you don't understand the circuit in the first place and then demand that others fix it for you or explain it to you.
    Last edited by mtripoli; - 23rd November 2011 at 15:58.

  25. #65


    Did you find this post helpful? Yes | No

    Default Re: 144 LED Games Console Project

    I don't know if it's the language barrier or what, but hell, I'll give it a shot, again.

    First, I don't know what the files are you keep posting, they have SCH and BRD extensions. I'm guessing that these belong to Eagle or something. So look, not everyone has these programs. I have Orcad and it uses the same extensions which means nothing. Save the output as PDF or jpeg or something that all PC's can open.

    Second, I've posted the schematic from the system that ART did at the beginning. It looks like you or someone decided to change the drive scheme from emitter follower to open collector (if you don't know those terms stop working on this project and get a basic electronics book and do some reading). That's fine if you understand what you are doing, but as far as I know the code that Art wrote won't work with this design. So I'm guessing that after someone answers your "R19" question and if you get though construction of an actual PCB and get it stuffed you'll blindly run the code and it won't work and a new thread will start about how the code is wrong. But I digress...

    As drawn in the schematic posted by "funnydrummer" R19 is connected to the column (anode) pin 13 of LED module (LED6) and to the pin 2 of the PIC which is pulled up by a 10k resistor. As drawn it does nothing. When you push the button tied to R30 the whole line of leds will light, that's it. There are column drivers through resistors R20-R29; I have no idea why they are different on LED1,3 and 5 than on LED2,4 and 6 but hey, whatever. The row connections are different on LED5 and LED6 as well. It may be some "Charlieplexing scheme" or it may simply be someone screwed up drawing the schematic, eh who knows. As its drawn it will be lots of fun to code for (that's sarcasm).

    I'm not trying to be an a-hole or anything, but it sounds like you don't really know what you're doing and have jumped in way over your head. Simply copying schematics and making PCB's might work for little opamp audio circuits and such, but there are concepts going on here that you don't have the grasp of. Have you done a simple project yet and just blinked an led?

    Also, these schematics are drawn horribly. Wires running all over the place like that is a recipe for disaster. Look at the schematic I drew; clean, clearly labeled, etc.

    The original schematic:
    http://www.scarydesign.com/144led/144LEDSCHEMATIC.pdf
    Attached Images Attached Images

  26. #66


    Did you find this post helpful? Yes | No

    Default Re: 144 LED Games Console Project

    Quote Originally Posted by mtripoli View Post
    As drawn in the schematic posted by "funnydrummer" R19 is connected to the column (anode) pin 13 of LED module (LED6) and to the pin 2 of the PIC which is pulled up by a 10k resistor. As drawn it does nothing. When you push the button tied to R30 the whole line of leds will light, that's it. There are column drivers through resistors R20-R29; I have no idea why they are different on LED1,3 and 5 than on LED2,4 and 6 but hey, whatever. The row connections are different on LED5 and LED6 as well. It may be some "Charlieplexing scheme" or it may simply be someone screwed up drawing the schematic, eh who knows. As its drawn it will be lots of fun to code for (that's sarcasm).
    Look mate, stop whining the whole time and at least have a look at the last schematic and board I posted.
    I can't remove the older post so I'm sorry for that schematic. The power LED was wrongly connected indeed...
    Since I'm only using 144 LEDs + a power LED, there are a lot of LEDs wich aren't connected. All unconnected LEDs will be covered with tape.
    That way you don't have to worry about flashing LEDs. The bottom-right LED is going to be used as power LED, simple as that.

    I'll let you know if it works though. I'm fixing the last errors now and then I'll be ordering a PCB.
    Not everyone's as skilled as another, no need to flame. Just try to help us out or don't bother posting... ;-)

  27. #67


    Did you find this post helpful? Yes | No

    Default Re: 144 LED Games Console Project

    LOOK MATE. If anyone here is whining its the people that know nothing about electronics, tackle these kinds of projects and then get on here or any other board asking for help on the simplest of things. I didn't "flame" anyone; if you go back and read the post without attitude you'll see that I wrote it tongue in cheek. As for "helping you out" I re-posted the board file and schematics after YOU and Svrzic sent me PRIVATE MESSAGES asking for help. I don't reply to private messages; the board is here for everyone to read all questions and see all replies.

    Part of the problem with all of this is people RUSH to drawing some schematic in some software they downloaded for free, usually riddled with mistakes, post it to a board like this, confuse others that don't have any experience either and when someone more knowledgeable points out the mistakes you get defensive and start up with "help us or leave". How about you help yourselves FIRST by going online or better yet buy a book on basic electronics and get a fundamental understanding of these things (if I recall you said in your private message you needed this for school). There is FAR MORE TO IT than simply copying someone else's schematic, etching a board in the sink and then loading someone else's code and crossing your fingers that it will work.

    As for "at least have a look at the last schematic and board I posted" I can't. You evidently posted Eagle schematic and board files. Not everyone has or uses these tools, and I'm not about to load up some software only to use it as a basic viewer. This is why we post in a neutral format like a simple jpeg or even a PDF so everyone can see it. Do yourself a favor and post your "latest" in something we can all see, and then those "more skilled" can have a look and potentially stop you from making a mistake that'll keep your project from working.

  28. #68


    Did you find this post helpful? Yes | No

    Default Re: 144 LED Games Console Project

    Quote Originally Posted by mtripoli View Post
    LOOK MATE. If anyone here is whining its the people that know nothing about electronics, tackle these kinds of projects and then get on here or any other board asking for help on the simplest of things. I didn't "flame" anyone; if you go back and read the post without attitude you'll see that I wrote it tongue in cheek. As for "helping you out" I re-posted the board file and schematics after YOU and Svrzic sent me PRIVATE MESSAGES asking for help. I don't reply to private messages; the board is here for everyone to read all questions and see all replies.

    Part of the problem with all of this is people RUSH to drawing some schematic in some software they downloaded for free, usually riddled with mistakes, post it to a board like this, confuse others that don't have any experience either and when someone more knowledgeable points out the mistakes you get defensive and start up with "help us or leave". How about you help yourselves FIRST by going online or better yet buy a book on basic electronics and get a fundamental understanding of these things (if I recall you said in your private message you needed this for school). There is FAR MORE TO IT than simply copying someone else's schematic, etching a board in the sink and then loading someone else's code and crossing your fingers that it will work.

    As for "at least have a look at the last schematic and board I posted" I can't. You evidently posted Eagle schematic and board files. Not everyone has or uses these tools, and I'm not about to load up some software only to use it as a basic viewer. This is why we post in a neutral format like a simple jpeg or even a PDF so everyone can see it. Do yourself a favor and post your "latest" in something we can all see, and then those "more skilled" can have a look and potentially stop you from making a mistake that'll keep your project from working.
    Nevermind. Thanks for the reply anyway. ;-)

    I'm not a professional, but I tend to learn from people who DO know a lot about electronics.
    And I'm not going to copy any code. The hardware is the 'easy' part, I think.
    I'll post the source for my version of snake (in C) when everything is fully working.

    In the zip file you can find the board file I've sent to the PCB company.
    I hope everything's working, if not, I'll let you guys know.

    Schematic:
    Name:  schematic.png
Views: 3002
Size:  33.6 KB

    Board:
    Name:  board.png
Views: 2932
Size:  74.9 KB
    Attached Files Attached Files

  29. #69


    Did you find this post helpful? Yes | No

    Default Re: 144 LED Games Console Project

    @funnydrummer: You don't need resistors on the base of an emitter follower so you can delete those entirely. If you're opposed to using resistors for current limiting (which is the only reason I can see to stack up diodes like you have from the supply) you can use a constant current regulator (CCR) device like the NSI45020T1G from ON Semi (Mouser, $0.34 each). If you use a CCR device you can get rid of all the transistors and resistors entirely and use just the CCR. Put one per drive segment (they can be used high side or low side, see schematic). Run the PIC from 5V and there you go. And why would you post C code on the Pic Basic forum?


    @Svrzic: The PDF schematic that is posted is FOR DISCRETE LEDS. Regardless if you buy them packaged or use discrete components the schematic is the same. I think you said you're 17 years old. Good for you for your interest in electronics but it sounds like you need to back up a bit and start with something a little easier.

    LEDMATRIX_CCR.pdf

  30. #70


    Did you find this post helpful? Yes | No

    Default Re: 144 LED Games Console Project

    This is really an edit, time expired when I went back...
    ***********************************************
    @funnydrummer: You don't need resistors on the base of an emitter follower so you can delete those entirely. If you're opposed to using resistors for current limiting (which is the only reason I can see to stack up diodes like you have from the supply, (which is a really bad idea but I'm not going into that) you can use a constant current regulator (CCR) device like the NSI45020T1G from ON Semi (Mouser, $0.34 each). If you use a CCR device you can get rid of all the transistors and resistors entirely and use just the CCR. Put one per drive segment (they can be used high side or low side, see attached schematic). Run the PIC from 5V (voltage regulators are a good thing, why you wouldn't use one I don't know) and there you go.

    You're going to need a 0.1uF on each Vdd pin, not just the one you have on the power supply line. While you're at it I'd put at least a 100uF cap on the power supply line as well. It doesn't look like you have a connector for doing ICSP so writing code and debugging will not be any fun at all (unless you like pulling a 40 pin part from a socket for every little change you make to code). If you plan on clipping to the PIC for programming you have no provision for isolating the Vpp line. There is no electrical reason at all for using pull-ups on two switches and pull-downs on the other two, as well as keeping track of that in code is unnecessary. You really should look at the schematic I posted. And why would you post C code on the Pic Basic forum?


    @Svrzic: The PDF schematic that is posted is FOR DISCRETE LEDS. Regardless if you buy them packaged or use discrete components the schematic is the same. I think you said you're 17 years old. Good for you for your interest in electronics but it sounds like you need to back up a bit and start with something a little easier.

    Attachment 6142

  31. #71


    Did you find this post helpful? Yes | No

    Default Re: 144 LED Games Console Project

    Quote Originally Posted by mtripoli View Post
    @funnydrummer: You don't need resistors on the base of an emitter follower so you can delete those entirely. If you're opposed to using resistors for current limiting (which is the only reason I can see to stack up diodes like you have from the supply, (which is a really bad idea but I'm not going into that) you can use a constant current regulator (CCR) device like the NSI45020T1G from ON Semi (Mouser, $0.34 each). If you use a CCR device you can get rid of all the transistors and resistors entirely and use just the CCR. Put one per drive segment (they can be used high side or low side, see attached schematic). Run the PIC from 5V (voltage regulators are a good thing, why you wouldn't use one I don't know) and there you go.

    You're going to need a 0.1uF on each Vdd pin, not just the one you have on the power supply line. While you're at it I'd put at least a 100uF cap on the power supply line as well. It doesn't look like you have a connector for doing ICSP so writing code and debugging will not be any fun at all (unless you like pulling a 40 pin part from a socket for every little change you make to code). If you plan on clipping to the PIC for programming you have no provision for isolating the Vpp line. There is no electrical reason at all for using pull-ups on two switches and pull-downs on the other two, as well as keeping track of that in code is unnecessary. You really should look at the schematic I posted. And why would you post C code on the Pic Basic forum?
    Thanks a lot for the suggestions, I really appreciate it!

    Too bad I already ordered the PCB, it's a big one so it would be a bit costly to order a second one.
    I might edit and optimize the schematic/board in the future, but for now I'm just hoping the current board will do.
    The next thing to do is programming. ;-)

    Good point though, this is forum isn't called PIC-C...
    I'm not familiar with basic programming, that's why I'm just gonna go with C.
    I thought it would be nice to post the source anyway, just for the people who prefer C over basic.

  32. #72


    Did you find this post helpful? Yes | No

    Default Re: 144 LED Games Console Project

    @SVRZIC: This is becoming a language problem of epic proportions. I've negotiated a full weeks "company" with a lovely Asian girl in China in less time and with less confusion than what's going on here. Are you saying that you want the led matrix redrawn with the little arrows added to each diode in the array? Man, I hope not... Go to Kingbright (www.kingbrightusa.com) and put in the part number TA20-11E and look at the data sheet. Maybe also try using Google Translate and writing out exactly what the problem is in your native language and then posting the translation here. It may not be perfect but maybe it'll clue us into what you want.

    @funnydrummer: I'm sorry to hear you already released the board. At the very least you'll need to tack solder in the decoupling caps across the VDD/VSS pins on the part/socket. Also as I said, you have no provision for doing ICSP. Those pins don't take kindly to having "stuff" hanging off them while programming. You don't need R1 through R8 at all so when you build it put in wire jumpers instead of resistors. Kludge in a dual SPST switch soldered across the pads in place of the resistor and hot glue the mess to keep it solid so you don't tear pads off the board. You can still get these "Test Clips" made by 3M and Pomona. Mouser has one for $45.96 (http://www.mouser.com/ProductDetail/...2ft7rMmGLEo%3d). You can again kludge the wire ICSP wire from your programmer to th eclip and then clip onto the part in the socket to flash the part. OF course, you have to figure out how well your programmer will work with a length of cable between the programmer and the DUT. I know from experience that the Melabs U2 is very forgiving of cable length (read "designed well") and I've managed some wires solder tacked in place to update a part in the field. The PicKit3 gives all kinds of errors one minute and works for days the next if you happen to bump the programmer cable (your mileage may vary). And if you don't put a series diode and resistor on the Vpp line you'll be stuffing something like +13V back onto the supply line. Hmmmm... Not so good.

    Your statement "I thought it would be nice to post the source anyway, just for the people who prefer C over basic" gave me quite the good chuckle. Yup, ALL KINDS of people who prefer C hanging around the Pic Basic (not just basic mind you, but Melabs Pic Basic) forum. And the PBP guys love answering C code questions, don't we fella's? Perhaps its something more like the PBP crowd is a bit more helpful than those on other boards and try and actually give people a hand with getting their stuff going. That is until the end when after offering all kinds of help the finally admit to using some kind of C or "other" Basic program and admit they can't get any help on the other boards so they come here.

    AS for me, I'm out. This thread has me weary (again) and I just had to put my dog down after 16 years so Right Now I couldn't care less if your project works or not. Do yourself some real help; look around the board at how people have designed their circuits and watch for commonalities. Get one of any number of "Programming PICS" books and do some reading. Read the damn datasheet for a programmable part and make sure you have some way to program it and if it has more than one VDD pin take it as gospel they all get a cap tied to them right at the pin and solidly to ground, not across the PCB as you've demonstrated. 20MHz huh? Good luck with that...

    Ciao.

  33. #73
    Join Date
    Dec 2011
    Posts
    3


    Did you find this post helpful? Yes | No

    Default Re: Shematic project complete

    Hi there.
    I started a few months with programming pic's
    I now made the 144 led display game and message scroller.
    But i now wanted to re-program the chip to only a message scroller for christmas.
    The picbasic code is to me to long and complex.
    How can i put in a different text, for instance "marry christmas"

    greatings Harrie

  34. #74
    Join Date
    Aug 2003
    Posts
    985


    Did you find this post helpful? Yes | No

    Default Re: 144 LED Games Console Project

    In the last version, the text message is stored plainly in the on-chip eeprom area of the 16F877.

  35. #75
    Join Date
    Dec 2011
    Posts
    3


    Did you find this post helpful? Yes | No

    Default Re: 144 LED Games Console Project

    Hai
    Yes i found the version 3. And it says that data can be put in internal memory.
    But with proton ide or mplab i can not compile the .bas-file. There are many many errors.
    I tried to rewrite but i am not experience enough.
    So i only want a simply massage scroller working with the 144 led display.
    The most simply one is enough.
    Greatings Harrie

  36. #76
    Join Date
    Nov 2003
    Location
    Wellton, U.S.A.
    Posts
    5,924


    Did you find this post helpful? Yes | No

    Default Re: 144 LED Games Console Project

    Problem found... This forum is for PicBasic not Proton.
    Dave
    Always wear safety glasses while programming.

  37. #77
    Join Date
    Aug 2003
    Posts
    985


    Did you find this post helpful? Yes | No

    Default Re: 144 LED Games Console Project

    Don't have to compile it, there's a hex file to use. Just change the values in the on-chip eeprom area with your pic programming software. Also you can use a serial terminal program to send the message to the unit. You would need Picbasic to change any way the program works, but not the message.

  38. #78
    Join Date
    Dec 2011
    Posts
    3


    Did you find this post helpful? Yes | No

    Default Re: 144 LED Games Console Project

    Hai
    i tried to use the serial posability. But i can not change anyting.
    I use the max232. With this i can read and write to a 16f628a, s the com and max232 are working.
    I first tried the original rx and tx ports but later i saw i had to use port e.1.
    No result.
    i push porta.1 when startup. The screen is blank.
    sending text
    restart
    no result.
    What dont i see??

    greatings Harrie

  39. #79
    Join Date
    Aug 2003
    Posts
    985


    Did you find this post helpful? Yes | No

    Default Re: 144 LED Games Console Project

    To Harrie & anyone else who has the hardware working,
    but cannot, for whatever reason, change the message stored in on-chip EEPROM.
    Here's something you can try:

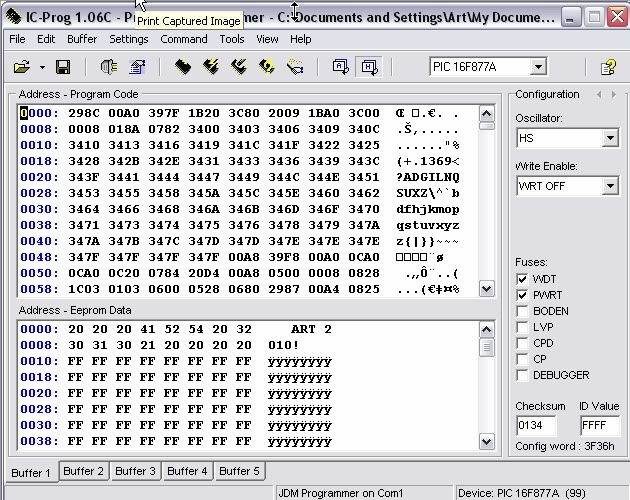
    Download ICprog Windows pic programming software for free from here:
    http://www.ic-prog.com/download.html

    Start the exe program, and select the 16F877A pic from the drop down menu of supported pic chips.
    Then you should be able to open the pic HEX file, and it should look like this:


    Bear in mind that if you manually edit the message this way,
    you also have to manually edit the message length.

    note the "non message" locations at the bottom end of on-chip EEPROM
    Code:
    DATA @$FC,12                            'text message length
    DATA @$FD,49 : DATA @$FE,125 : DATA @$FF,0            'set initial high scores for games

    Now you can edit the individual message locations, update the message length, cheat on hi scores if u have to, and save the hex file!
    Now open the hex file in your own pic programming software and write to the 16F877A.

    Cheers, Art.

  40. #80
    Join Date
    Dec 2007
    Location
    Paris
    Posts
    101


    Did you find this post helpful? Yes | No

    Default Re: 144 LED Games Console Project

    Just found this great project and was really excited!

    I have just finished drawing a PCB for it, with two possible versions: one with 5mm leds and the other with large 10mm leds. It's all using surface mount components, but they are not that hard to solder (in fact it is easier!).

    The matrix is now driven my a pair of PNP/NPN or P/N channel mosfet in order to boost the brightness. Since the multiplexing routine slice the display in 18 increments, it is possible to boost the brightness by feeding more intensity in the LEDs this way. For simplified rooting of the board, I also changed the pin allocations for the PIC. The program will need to be modified a bit to account for that, and for the inverted signal needed to drive the base of the PNP transistors.

    The board has an integrated regulator (7805) and also an optional DB9 for serial communication with voltage converter (using a simple transistor, not a full MAX232). It also feature an ICSP connector, so it can be easily reprogrammed for other projects.

    Need to check a few things, but I'll be happy to release the gerber files here. Also I'm planning to make an order from my PCB manufacturer, so if anyone is interested I can sell spares for a reasonable price.


Similar Threads

  1. Conway's Game Of Life
    By wellyboot in forum mel PIC BASIC Pro
    Replies: 45
    Last Post: - 28th May 2020, 06:14
  2. new and need help
    By smeghead in forum mel PIC BASIC Pro
    Replies: 5
    Last Post: - 3rd November 2008, 20:19
  3. LCD will not start
    By btaylor in forum mel PIC BASIC Pro
    Replies: 49
    Last Post: - 24th May 2007, 02:30
  4. can't even flash an LED
    By bruno333 in forum mel PIC BASIC Pro
    Replies: 7
    Last Post: - 28th April 2005, 13:27
  5. simple LED Blinking project
    By koossa in forum mel PIC BASIC Pro
    Replies: 4
    Last Post: - 11th December 2004, 01:25

Members who have read this thread : 1

You do not have permission to view the list of names.

Posting Permissions

  • You may not post new threads
  • You may not post replies
  • You may not post attachments
  • You may not edit your posts